Insulation removal requires special tools like insulation vacuums that are designed for fibreglass or cellulose. It also requires specialized equipment like a wire stripper to remove the electrical insulation on electric wires.
Old and damaged insulation can lead to poor indoor air quality, pest infestations and structural damage. It is often necessary to remove existing insulation during a renovation or retrofit project. Click the https://www.perthinsulationremover.com.au/ to learn more.
Insulation removal is an important part of a home renovation project. The process helps improve the energy efficiency of your house and creates a healthier environment. However, the task can be difficult and time-consuming if you don’t have proper equipment and preparation. To make the job easier, it is recommended to hire a professional insulation contractor. They will have the experience and equipment needed for a fast and thorough cleanup. They will also know how to identify the type of insulation in your attic, which will allow them to plan the best removal strategy. This can save you a lot of time and effort.
To remove insulation, you’ll need the following equipment:
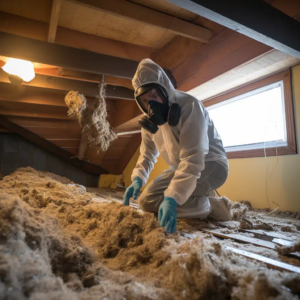
-Ladders: Ensure that your ladder is stable and suitable for the attic space you’re working in. -Protective Gear: Gloves, a mask, goggles, and utility knives are essential for a safe removal. Wearing these protective items can help reduce the risk of exposure to harmful materials like asbestos and fiberglass particles. -Tools: A garden rake and pitchfork can be used to scoop up loose insulation and rake it into piles for easy removal. A large vacuum and waste bags are also necessary for a quick cleanup.
Before you start the process, it’s important to clear your attic of any stored items so you can easily access and navigate the area. It’s also a good idea to turn off your HVAC system, as this will prevent any contaminated air from circulating throughout your home during the removal process. Finally, it’s a good idea to put down plastic sheeting or tarps over furniture and other objects that you don’t want to get dirty.
Once the removal process is complete, it’s important to dispose of the insulation properly. Check with your local waste management authority to see what options are available for removing and disposing of blown-in cellulose, fiberglass, or rockwool insulation. In most cases, you’ll have to pay a fee to dispose of these materials, so it’s important to do your research before hiring a professional insulation contractor. Alternatively, you can contact a recycling facility that accepts these materials.
Designed for easy disposal of insulation material.
Disposing of old insulation can be difficult, especially if the materials contain hazardous materials. This can pose a health risk to anyone who comes into contact with them and can also lead to legal consequences. It is essential to follow proper disposal methods regulated by local authorities to avoid this. Hiring professional services ensures that the process is done properly and safely.
The first step in disposing of insulation is to identify the type of material that was used. This is essential because different types of insulation have varying recyclability and require specific disposal techniques. If you are not sure what kind of insulation was installed in your home, contact a professional to learn more about the best way to dispose of it.
Once the type of insulation has been identified, it can be placed in a trash bag and sealed. It is important to wear gloves and long sleeves when handling fiberglass insulation to protect yourself from the tiny fibers that may cause itching or irritation. It is also a good idea to wear a face mask when handling cellulose insulation, since it is often blown loose and can easily be inhaled.
After the insulation has been bagged, it can be placed in a dumpster for easy disposal. This is the most effective method for large-scale projects, as it can be thrown along with other debris such as drywall, wood trim, and flooring. This will make the cleanup and removal process much faster and easier.
When hiring professional services for the disposal of old insulation, it is important to find ones with experience and a solid track record. They should also have the appropriate licenses and certifications to handle hazardous materials. They should also be able to provide a detailed plan for removing and disposing of the insulation while prioritizing safety.
It is also crucial to hire professionals who have experience working on construction and demolition sites. This will help them navigate the challenges that may arise during the removal process, such as navigating obstacles and working around pipes and wires. The professionals should also have a plan for cleaning and decontaminating the work area once the job is complete.
Designed for a quick cleanup.
When it comes to removing insulation, the preparation stage is key for a successful job. This includes making sure that the proper personal protective equipment is in place, and that the workspace is sealed to limit spread of contaminants. Knowing the type of insulation that is present can also make the removal process more efficient. Different types of insulation require different techniques, so thorough identification and preparation will help the task run more smoothly.
An attic inspection should be performed before beginning any work to identify sagging spots and moisture damage, and determine the condition of the current insulation. In addition, a flashlight can be used to check all corners of the attic for pests and other obstructions that could interfere with the vacuum cleaner. A good plan of action should be developed for each area that is to be cleaned.
Inspecting the attic can be a dangerous project, especially when the home has older insulation that may contain asbestos or other hazardous materials. It is important to use a flashlight and take your time as you go over the attic, checking every area for issues that need to be addressed. This will ensure that the insulation removal process goes as smoothly as possible and that all areas are addressed properly.
The most common type of attic insulation is fiberglass batts, which can be easily removed with a flathead screwdriver and an insulation vacuum. It is important to wear a mask to prevent inhalation of any fiberglass dust or fibers. Additionally, it is a good idea to wear gloves and eyewear protection during the entire process. Ventilation is also crucial, and a fan or windows should be opened to ensure that air can circulate freely.
Other types of insulation such as foam board and cellulose insulation can be more difficult to remove, but with the right tools, it is possible to complete the job in a timely manner. A specialized insulation vacuum is usually the best choice, and it is important to set up a containment area for the work. This will keep the dust and debris from spreading throughout the rest of the house.
Designed for a safe removal.
Insulation removal requires specialized tools and equipment, which affects the overall cost of the project. The square footage of the space to be cleared also plays a role in the cost, as well as local disposal regulations and other factors.
Choosing a reputable insulation removal company is crucial for safe and effective service. Look for comprehensive providers that offer additional services, such as air sealing and installation of new insulation. A full-service provider can streamline the entire process and provide you with a more accurate quote.
Old insulation may contain harmful contaminants, including animal feces and mold spores. Depending on the type of insulation, it may also contain chemicals that require special handling and disposal. Inhaling these substances can lead to health problems, so it is important to wear personal protective equipment (PPE) during the insulation removal process. This includes gloves, a mask, and safety goggles to protect your hands and eyes from insulation particles, dust, and other hazards. You should also keep your family and pets out of the home during the removal process to prevent them from inhaling the harmful chemicals or being exposed to pests.
Insulation removal is a serious task that is best left to professionals. If not handled properly, the process can damage existing structures and create health risks. It is especially important to have the home or building inspected before starting the process to ensure it meets local regulations and is safe for renovations and repairs.
Professionals can save homeowners time and money by handling the entire process, from removing old insulation to preparing the area for new materials. They can also ensure proper disposal of the materials, which is a requirement for compliance with environmental regulations. They can even help with the purchase of replacement insulation to ensure a high level of energy efficiency.
Insulation removal is an essential part of a renovation or repair, but it can be dangerous and time-consuming if not done correctly. Improper removal techniques can cause damage to the existing structure and impact indoor air quality, leading to costly repairs. In addition, the old insulation can be a source of allergens and irritants, including mold spores, fungi, and other pathogens.