Pros and Cons of Vinyl Siding

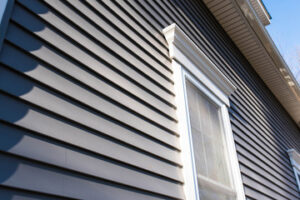
Whether gracing the crisp lines of modern architecture or accentuating the quaint charm of a historic home, white vinyl siding adapts seamlessly to a variety of architectural styles. Its neutral tone complements roof and trim colors for a cohesive exterior.

Vinyl Siding

Choose a quality contractor and invest in premium vinyl siding to enjoy its benefits for years to come. This includes increasing your home’s resale value and reducing energy costs. Contact Vinyl Siding Richmond for professional help.

Most homeowners spend more time on their home’s interior than they do with its exterior, but a house’s façade is crucial to its curb appeal, energy efficiency and resale value. That’s why many choose vinyl siding, a durable cladding material that holds up to the elements and requires minimal maintenance. However, like any building material, vinyl has its pros and cons. Here, we’ll take a look at how long vinyl lasts, how it’s affected by environmental factors, and the best ways to protect your investment.

The average lifespan of vinyl siding depends on several factors, including installation techniques and climate conditions. A professional installation and regular maintenance are the best way to keep your vinyl looking and functioning its best. The longevity of vinyl also depends on the type of product you buy – a higher-grade product will last longer than lower-quality versions.

Vinyl is an incredibly strong and durable cladding material that can hold up to high winds, hail and freezing temperatures. The material is also resistant to fading, scratching and staining, and is available in a wide range of colors that will fit any aesthetic. In addition, it can be cut to accommodate tight or unique spaces that may not be suitable for other types of cladding.

Like wood, vinyl has a distinct appearance that can complement any architectural design and style. However, its main drawback is that it is not as eco-friendly as other options. Its polyvinyl chloride (PVC) composition can take centuries to break down in landfills, and the manufacturing process releases toxins into the environment. Other alternatives, such as fiber cement and engineered wood, offer better environmental protection while still offering the visual appeal of natural wood.

Depending on the climate, vinyl can be vulnerable to warping and melting, particularly in areas with extreme temperatures. If you notice that your vinyl is warping or discoloring, it’s a sign that it’s time for replacement. In addition, if you find mold, mildew or other signs of moisture intrusion, that’s another reason to get new vinyl as soon as possible.

Aesthetics

Aside from its durability and affordability, vinyl siding is available in a wide array of colors and textures to suit homeowners’ unique aesthetics. From rustic charm to a clean modern flair, the right color and style can help highlight desirable architectural features and add visual appeal. A wide variety of trim options are also available to create a cohesive and appealing exterior.

Choosing the right vinyl siding color requires careful consideration of many factors. Not only should it complement the architectural style of the house, but it should also take into account local climate conditions. For example, homes located in areas with intense sunlight should consider light shades to prevent fading and discoloration over time. Conversely, homeowners in colder climates may benefit from darker shade options that can help absorb heat and reduce energy costs.

When choosing a vinyl siding color, it’s important to keep in mind that the appearance of any color can vary depending on lighting conditions. Using an online home visualization tool to test a siding color in different weather conditions can help homeowners get a better idea of how it will look when applied to their homes.

White vinyl siding is an excellent choice for those looking to refresh their home’s exterior with a classic and timeless look. Its pristine appearance can stand out against a lush landscape or provide a striking contrast to a vibrant roof color. In addition, it pairs well with a variety of other materials and textures, such as wood accents or natural stone.

For those interested in a more personalized look, specialty vinyl siding styles like log cabin, board and batten, and cedar shake offer distinctive options that can elevate a home’s curb appeal. These unique texture options offer a dimensional appearance with the added benefits of low maintenance and weather resistance.

Maintenance

Vinyl is an ideal option for homeowners who prefer to take a hands-off approach to home exteriors. Unlike wood siding, which is prone to warping and peeling, vinyl requires minimal maintenance. Cleaning is typically the only effort required, and it can be completed with a soft brush and a combination of water and vinegar. In some cases, a solution of laundry detergent or powdered household cleaner may be necessary to remove more stubborn stains.

In addition to cleaning, regular visual inspections are recommended to identify any damage or wear that can be addressed before it worsens. Inspecting for broken panels, cracks, warping and discoloration can help to prolong the life of your siding and reduce energy bills.

During your inspection, be sure to check the integrity of your vinyl siding. If your siding is loose or cracked, this can lead to water leaks and mold growth. In some cases, it can also affect the appearance of your home and make it look unappealing. Additionally, you should inspect your vinyl siding for signs of fading.

Vinyl siding is color fast, but sun exposure can cause the colors to fade over time. If the fading is severe, it may be time to consider replacing your vinyl siding with a more energy-efficient option that can improve the curb appeal and value of your home.

If you decide to replace your vinyl siding, a professional installation is essential to ensure long-term durability. Proper installation techniques include leaving a gap at the ends of each panel, using J-channel around windows and doors, and crimping or nailing the trim pieces to ensure a secure, weatherproof fit. It is also important to use corrosion-resistant nails and staples, and to install sill trim at the soffits.

Finally, be sure to check your vinyl siding after a heavy storm to see if any panels have come loose or are damaged. If you notice any damage or fading, it is best to have it repaired right away before the problem worsens. With proper care and inspection, your vinyl siding can last for decades.

Energy Efficiency

A quality vinyl siding product is a good choice to help your home become more energy efficient. This is because it provides an excellent insulating barrier that helps keep warm air in during the winter and cold air out during the summer. It also keeps your heating and cooling systems from having to work overtime, which can save you money on your energy bills over time.

In addition to its energy-saving properties, vinyl siding is also a green building material. It can be recycled, and it does not require painting or staining, which means that it does not release harmful chemicals into the environment when it is removed from your home. Additionally, since vinyl does not require caulking, you can avoid the additional cost of labor associated with this task.

When installed correctly, insulated vinyl siding offers superior insulation that can reduce your energy costs significantly. It prevents the loss of heat between wall studs that occurs in many homes, a process known as thermal bridging. Without the proper insulated siding, heat seeps into the house during the summertime and escapes in the wintertime, forcing your HVAC system to work harder to maintain a comfortable temperature.

VSI has worked tirelessly to get insulated vinyl siding recognized by the energy code as continuous insulation, and it is now approved for use in most climate zones. It can be used in combination with other insulating products to achieve the R-value required by the code.

Installing insulated vinyl siding is a professional job, and it should be done by an experienced contractor. Before installing your new insulated siding, draw a chalk line along the base of your wall and make sure to follow it when cutting your vinyl panels. This will ensure a clean, consistent look and a tight fit that can minimize air leakage. Once your panels are cut, they should be nailed together with corrosion-resistant nails and overlapped by an inch to accommodate expansion and contraction of the material.

In addition to reducing your energy bills, a properly installed insulated vinyl siding will add value to your home and provide you with an attractive and durable home improvement solution.

Insulation Remover – Why You Should Hire a Professional Insulation Contractor

Insulation removal requires special tools like insulation vacuums that are designed for fibreglass or cellulose. It also requires specialized equipment like a wire stripper to remove the electrical insulation on electric wires.

Old and damaged insulation can lead to poor indoor air quality, pest infestations and structural damage. It is often necessary to remove existing insulation during a renovation or retrofit project. Click the https://www.perthinsulationremover.com.au/ to learn more.

Insulation removal is an important part of a home renovation project. The process helps improve the energy efficiency of your house and creates a healthier environment. However, the task can be difficult and time-consuming if you don’t have proper equipment and preparation. To make the job easier, it is recommended to hire a professional insulation contractor. They will have the experience and equipment needed for a fast and thorough cleanup. They will also know how to identify the type of insulation in your attic, which will allow them to plan the best removal strategy. This can save you a lot of time and effort.

To remove insulation, you’ll need the following equipment:

-Ladders: Ensure that your ladder is stable and suitable for the attic space you’re working in. -Protective Gear: Gloves, a mask, goggles, and utility knives are essential for a safe removal. Wearing these protective items can help reduce the risk of exposure to harmful materials like asbestos and fiberglass particles. -Tools: A garden rake and pitchfork can be used to scoop up loose insulation and rake it into piles for easy removal. A large vacuum and waste bags are also necessary for a quick cleanup.

Before you start the process, it’s important to clear your attic of any stored items so you can easily access and navigate the area. It’s also a good idea to turn off your HVAC system, as this will prevent any contaminated air from circulating throughout your home during the removal process. Finally, it’s a good idea to put down plastic sheeting or tarps over furniture and other objects that you don’t want to get dirty.

Once the removal process is complete, it’s important to dispose of the insulation properly. Check with your local waste management authority to see what options are available for removing and disposing of blown-in cellulose, fiberglass, or rockwool insulation. In most cases, you’ll have to pay a fee to dispose of these materials, so it’s important to do your research before hiring a professional insulation contractor. Alternatively, you can contact a recycling facility that accepts these materials.

Designed for easy disposal of insulation material.

Disposing of old insulation can be difficult, especially if the materials contain hazardous materials. This can pose a health risk to anyone who comes into contact with them and can also lead to legal consequences. It is essential to follow proper disposal methods regulated by local authorities to avoid this. Hiring professional services ensures that the process is done properly and safely.

The first step in disposing of insulation is to identify the type of material that was used. This is essential because different types of insulation have varying recyclability and require specific disposal techniques. If you are not sure what kind of insulation was installed in your home, contact a professional to learn more about the best way to dispose of it.

Once the type of insulation has been identified, it can be placed in a trash bag and sealed. It is important to wear gloves and long sleeves when handling fiberglass insulation to protect yourself from the tiny fibers that may cause itching or irritation. It is also a good idea to wear a face mask when handling cellulose insulation, since it is often blown loose and can easily be inhaled.

After the insulation has been bagged, it can be placed in a dumpster for easy disposal. This is the most effective method for large-scale projects, as it can be thrown along with other debris such as drywall, wood trim, and flooring. This will make the cleanup and removal process much faster and easier.

When hiring professional services for the disposal of old insulation, it is important to find ones with experience and a solid track record. They should also have the appropriate licenses and certifications to handle hazardous materials. They should also be able to provide a detailed plan for removing and disposing of the insulation while prioritizing safety.

It is also crucial to hire professionals who have experience working on construction and demolition sites. This will help them navigate the challenges that may arise during the removal process, such as navigating obstacles and working around pipes and wires. The professionals should also have a plan for cleaning and decontaminating the work area once the job is complete.

Designed for a quick cleanup.

When it comes to removing insulation, the preparation stage is key for a successful job. This includes making sure that the proper personal protective equipment is in place, and that the workspace is sealed to limit spread of contaminants. Knowing the type of insulation that is present can also make the removal process more efficient. Different types of insulation require different techniques, so thorough identification and preparation will help the task run more smoothly.

An attic inspection should be performed before beginning any work to identify sagging spots and moisture damage, and determine the condition of the current insulation. In addition, a flashlight can be used to check all corners of the attic for pests and other obstructions that could interfere with the vacuum cleaner. A good plan of action should be developed for each area that is to be cleaned.

Inspecting the attic can be a dangerous project, especially when the home has older insulation that may contain asbestos or other hazardous materials. It is important to use a flashlight and take your time as you go over the attic, checking every area for issues that need to be addressed. This will ensure that the insulation removal process goes as smoothly as possible and that all areas are addressed properly.

The most common type of attic insulation is fiberglass batts, which can be easily removed with a flathead screwdriver and an insulation vacuum. It is important to wear a mask to prevent inhalation of any fiberglass dust or fibers. Additionally, it is a good idea to wear gloves and eyewear protection during the entire process. Ventilation is also crucial, and a fan or windows should be opened to ensure that air can circulate freely.

Other types of insulation such as foam board and cellulose insulation can be more difficult to remove, but with the right tools, it is possible to complete the job in a timely manner. A specialized insulation vacuum is usually the best choice, and it is important to set up a containment area for the work. This will keep the dust and debris from spreading throughout the rest of the house.

Designed for a safe removal.

Insulation removal requires specialized tools and equipment, which affects the overall cost of the project. The square footage of the space to be cleared also plays a role in the cost, as well as local disposal regulations and other factors.

Choosing a reputable insulation removal company is crucial for safe and effective service. Look for comprehensive providers that offer additional services, such as air sealing and installation of new insulation. A full-service provider can streamline the entire process and provide you with a more accurate quote.

Old insulation may contain harmful contaminants, including animal feces and mold spores. Depending on the type of insulation, it may also contain chemicals that require special handling and disposal. Inhaling these substances can lead to health problems, so it is important to wear personal protective equipment (PPE) during the insulation removal process. This includes gloves, a mask, and safety goggles to protect your hands and eyes from insulation particles, dust, and other hazards. You should also keep your family and pets out of the home during the removal process to prevent them from inhaling the harmful chemicals or being exposed to pests.

Insulation removal is a serious task that is best left to professionals. If not handled properly, the process can damage existing structures and create health risks. It is especially important to have the home or building inspected before starting the process to ensure it meets local regulations and is safe for renovations and repairs.

Professionals can save homeowners time and money by handling the entire process, from removing old insulation to preparing the area for new materials. They can also ensure proper disposal of the materials, which is a requirement for compliance with environmental regulations. They can even help with the purchase of replacement insulation to ensure a high level of energy efficiency.

Insulation removal is an essential part of a renovation or repair, but it can be dangerous and time-consuming if not done correctly. Improper removal techniques can cause damage to the existing structure and impact indoor air quality, leading to costly repairs. In addition, the old insulation can be a source of allergens and irritants, including mold spores, fungi, and other pathogens.

The Basics of Pest Control

Pest Control Portland Maine aims to manage pests to prevent or reduce damage to plants and crops. It includes prevention – keeping pests from happening, suppression – reducing the number of pests to an acceptable level and eradication – eliminating a specific pest population.

Use preventive nonchemical methods first, like removing food sources or blocking access to water, shelter and entry points, before attempting to control a problem with chemicals. Always follow label instructions and safety protocols.

Proper pest identification is the first step to developing a pest control strategy. It helps you understand the pest’s life cycle and behavior, and how best to manage it without causing injury to desirable organisms.

Some pests have a frightening or grotesque appearance, like spiders, silverfish and earwigs; others bite or sting (real or perceived), such as bees, hornets, wasps and yellowjackets; and some contaminate food or damage buildings or personal belongings, such as mice, rats, cockroaches and clothes moths. Some pests also carry and spread disease, such as fungus gnats, mites, aphids, thrips and nematodes.

Pests often live or seek shelter in dark, secluded places where they are difficult to see. A flashlight and an extendable mirror can help you find these areas and inspect for signs of infestation, including insect parts, frass (excrement) and other indications of a pest’s presence. A magnifying glass will help you examine tiny insect parts and other evidence for accurate pest identification.

Incorrect pest identification can lead to poorly chosen management tactics that would not be effective against the actual pest. For example, a generalized identification of leafminer species such as Liriomyza trifolii might result in an unsatisfactory response to commonly used insecticides. An accurate identification of the pest, however, would allow you to select a more specific pesticide product.

Correct identification also allows you to identify the pest’s weak points or windows of opportunity for controlling it. These times may be in the early stages of development for plants or in immature forms for insects. Weeds are easiest to control in the seedling stage and during the early part of the growing season for annuals; while insects are most susceptible to management tactics in their egg, larval and pupal stages.

If you are not able to identify your mystery pest by examining its physical characteristics, the entomologists at the MMPC’s Free Pest ID Center can analyze a specimen or images of the bug for you. The identification results will include recommendations for treatment. Please visit the Pest ID page for more information about how to submit a specimen or send an image of your mystery pest for identification.

Barriers

Physical barriers prevent pests from accessing their targets, including structures and food plants. They can be as simple as screens on windows, door sweeps that close the gap under doors, and sealants that fill holes or cracks around the foundation or exterior walls of a home.

Chemical barriers are substances that deter or kill pests, often in combination with other factors. They can be natural oils such as peppermint or specialized non-toxic products that create an invisible barrier that bugs don’t want to cross. They can also include baits that lure pests and then kill them or products such as nematodes that disrupt the gut of certain pests to starve them.

Pest control is about avoiding pest damage and harm to people, animals, or the environment. This is a goal that requires balancing esthetic, health, and economic considerations. When the number of pests in an area reaches unacceptable levels, action is required. In the garden, this may mean removing weeds that harbor pest insects; cleaning equipment that spreads plant pests from one place to another; or trap cropping (placing a host of the insect’s favorite food near crops that will be attacked, such as squash planted close to cucumbers for aphids).

Prevention and exclusion strategies are important in controlling most pests. They help reduce the need for pesticides, which are not without risk to humans and other species. They are also more environmentally friendly than suppression techniques, which only target an existing population of pests.

Preventative measures can be broken down into three stages: prevention – keeping pests from occurring in the first place; suppression – reducing their numbers to acceptable levels; and eradication – destroying an entire pest population.

The goal of GoodMonsters Rodent & Wildlife Control is to prevent pests from entering your home. Our technicians perform a thorough inspection of your property to identify and seal weak spots that pests use for entry. This includes checking for sumps and drainage issues that could attract roaches or mice. When we’re done, our team will install barrier treatments at these points to keep your pests and rodents away.

Baits

Baits are effective tools for pest control and can be used to treat termite infestations, cockroaches, rodents and ants. They can be used alone or in combination with other treatments, such as a liquid barrier application. Most baits contain low-risk pesticides that are less volatile than other products, and may require fewer applications. These chemicals are often effective and safe when applied according to label instructions and with proper precautions.

The efficacy of any baiting program depends on how well the bait is designed, where it is placed, and how often it is inspected. For example, if wood-eating termites are the target of the treatment, the size of the bait, its compaction and composition can make or break its performance. Ideally, the bait should encourage a maximum number of termites to consume it and provide rapid control.

Termite baits are usually installed underground around the entire perimeter of the structure. However, they can also be affixed indoors over active termite tunnels. Depending on the product and company protocol, inspections may occur monthly, quarterly, biannually or annually. Termite baits are usually combined with other forms of treatment, such as foam or liquid barriers.

Some termite baits are liquid, while others are powder. The former are more easily applied than the latter, which must be poured from a container. Gel ant baits are another type of bait that can be easier to apply than liquid or powder baits. These can be applied with a syringe-like applicator or in prefilled bait stations.

Live baits are another form of bait that can be used for pest control. Minnows, trout, bass and other freshwater fish are often attracted to fly containing worms or small insects. Insect larvae are also excellent live baits for many fish, including brown trout and largemouth bass. These include mayflies, stoneflies, caddis flies and dobsonfly larvae.

If using natural baits for fishing, it is important to store them properly. If the bait is not properly stored, it can deteriorate and become ineffective. The bait should be kept in an air-tight container, with little or no light exposure. In addition, it should be refilled regularly, especially after rain or other weather events.

Traps

Pest traps can play an important role in any pest control program. These tools are used to monitor pest populations and can help predict the optimal timing of treatment, reducing the need for broad-spectrum chemicals. Smart traps combine real-time monitoring with automated responses, reducing the risk of human error and improving operational efficiency.

Sensors in smart traps can detect movement, body heat or specific behaviors that are typical of certain pests. This precision allows the trap to activate only when the pest is present, preventing unnecessary triggers from other organisms. In addition, many sensors use data analytics to identify patterns and predict future pest activity. This information can be used to optimize existing pest management strategies and improve long-term pest control programs.

Traps can be set up in areas where pests are most common, such as around baseboards, corners of rooms or near food sources. They can also be placed along pest pathways, where insects tend to travel. Some traps are specifically designed for flies or other flying pests, attracting them with the use of baits such as fruit juice or apple cider vinegar.

Some traps are designed to lure the pest into an escape-proof enclosure and kill it. These traps may be pheromone-based, using synthetic attractants that simulate the natural pheromones of male insects to lure females (which avoids oviposition). Other traps are based on an adhesive surface that enables the pest to adhere, and others use a funnel-shaped entrance to capture the insect.

While traps can be effective for limited pest infestations, such as a single cricket or wolf spider in a room, they are not the best solution for pest prevention. Sticky traps can provide a good snapshot of where pests are located, but the best way to solve a pest problem is by addressing their habitat.

Integrated pest management involves a variety of approaches, including physical barriers, baits and traps, to reduce the need for chemical treatments. The goal is to create a sustainable environment that minimizes the need for pesticides and promotes ecological balance. In agricultural settings, this means promoting biodiversity and supporting sustainable agriculture practices.

How to Choose a Dock For Your Garden

The most important consideration is the dock’s capability to support your monitor(s). Check its maximum supported resolutions and refresh rates. It also helps to note whether it has a microphone port, an SD card reader, and ports related to peripherals that stay attached to the dock.

The Dock is a prominent feature of macOS and its predecessors, including NeXTSTEP and OPENSTEP. It is also available for Linux, as part of window managers such as AfterStep’s iTask and KXDocker. Read on Charleston Dock Works to learn more about this essential supply chain logistics function.

While docks are usually a nuisance and considered an invasive species, their greens are edible. They can be eaten raw or cooked in place of spinach, chard, or collards. They have a mild, slightly bitter flavor and are a good source of vitamins A and C. They are also rich in iron and protein. They can be harvested throughout the year, but they are more tender in the spring.

The most tender leaves and best lemony (sour) flavor come from young dock plants before the flower stalk develops. The leaves are oblong to spear-shaped, with rounded bases and often reddish-tinged margins. The leaves, stems, and seeds can be eaten. The seed starts out green but will darken to a reddish brown as it matures. This is when you want to harvest them for making dock seed flour.

Dock plant roots are also edible, and they can be harvested from late spring to early summer. The roots are very similar to rhubarb and are similar in taste. They are a little tougher than rhubarb, but have a sweeter and less fibrous texture. They can be used in a variety of ways, including soups and stews.

The young stems of dock are a tasty alternative to spinach, and are especially good in the spring. They can be eaten either steamed or sauteed, and have a light, mild greens flavor. They are particularly tasty when steamed with onions and eggs. The petioles (leaf stems) are also edible, but should be harvested before the leaf blade becomes tough or woody. Look for stems that bend easily, and test them to see if they stretch without tearing. If they are too tough, they should be boiled or sauteed.

Like many wild greens, dock contains oxalic acid, which can cause kidney stones in people who are prone to them. If you are prone to kidney stones, be sure to consume only a small amount of dock per day. However, if you are generally healthy and do not eat large quantities of wild greens on a regular basis, it should be fine.

Docks are sour

In addition to their sour flavor, dock leaves are high in Iron and Vitamin C. They are also a source of beta-carotene, which helps to boost the immune system. They are also a good source of minerals such as calcium, potassium, and magnesium. However, they are high in oxalic acid and should not be eaten by people with kidney problems. Oxalic acid interferes with the body’s ability to absorb calcium, which can lead to kidney stones. It is recommended to cook these greens before eating them to reduce their oxalic content. It is also best to remove the midrib of the leaf, or petiole, before using them. This will help prevent excessive mucilage and keep the leaves crunchy.

While it’s true that mature dock leaves can be bitter, young leaves are a delicious addition to salads. They can be used in place of dandelion or endive, and their lemony flavor complements mild greens. They can also be sauteed or added to soups. The seeds of dock, which are similar to those of buckwheat, can be toasted and mixed with other ingredients like granola or crackers.

Dock leaves can be rubbed on nettle stings to relieve the pain. They are also useful for treating indigestion and constipation. The plant’s roots are also a good source of protein. The sour flavor of dock leaves is due to the presence of oxalic acid, which can cause kidney stones in those with poor diets. This is why it is important to eat plenty of green vegetables, such as kale and spinach, and to avoid processed foods.

The edible plants of the dock genus (Rumex) include curly dock and broad-leaf dock. Both have thick, rhubarb-like stems and leaves that are sour when cooked. They are commonly grown in wet habitats, and people eat the leaves raw or cook them. They are rich in vitamins and minerals, and can be added to salads or soups. Both species can be invasive in some areas.

Broad-leaf dock and curly dock are widely distributed throughout North America. They occur as far north as Greenland and the interior of Alaska, but are less common in eastern and inter-mountain regions. They are also tolerant of dry conditions and drought.

Docks are drought-tolerant

Docks are a perennial species that typically grows in wet areas and is tolerant of soil disturbance. They have deep taproots that allow them to absorb moisture from a deeper level, making them able to withstand drought conditions. They also grow in a wide range of soil types, making them adaptable to many environments. However, they require regular watering and fertilization to maintain optimal growth and health. They are also attracted to pollinators, helping prevent soil erosion and enhancing garden biodiversity.

The two most common dock species are broadleaf and curly dock. Both begin as basal rosettes and eventually bolt and produce erect flower stalks that can be up to 5 feet tall. These flowers release seeds that disperse readily through wind or water. It is easy to tell the difference between the two plants by their leaf width and margins; broadleaf dock leaves have wider margins than curly dock, and the base of the leaf stalk joins the leaf stem more abruptly than with curly dock. Both plants are host to the rust Uromyces rumicis and the beetle Gastrophysa viridula, but fewer natural enemies damage them than do other forage species.

Although docks are very resilient, they can become invasive in some settings. Infestations are most common in no-till and perennial systems, where they can outcompete crop seedlings for water and nutrients. Regular mowing can reduce the number of blooms and seeds, but it does not fully control the plant. Heavy grazing can increase dock populations, but it does not work well as a control strategy (especially since dock is poisonous to livestock).

Tillage is effective for managing docks in annual crops. This is especially important in fields that have been converted from a perennial forage to an annual crop. It can be done in mid-summer, when the plant is at its most vigorous growth, and plowed beneath the surface of the soil. However, regrowth from the root system can occur after this treatment.

Proper cultivation can help ensure that your dock will remain durable and aesthetically pleasing. To do so, you must know the different stages of the dock’s life cycle. Moreover, you should choose a location that has full sun and well-draining sandy or rocky soils.

Docks are poisonous

If you are a forager, then you know how important it is to find the right plant before picking it. This is especially true for plants that can be toxic to people. The leaves of dock contain oxalic acid, which is what makes them sour and potentially dangerous. Eating too much of this plant can lead to kidney stones in susceptible people. This is why you should always eat these greens in moderation. If you do eat them, be sure to cook them first.

Like rhubarb and sorrel, dock leaves are sour because of the oxalic acid they contain. But this sourness can become dangerous if the leaves are eaten raw, especially by children. This is because their size can obstruct airways if ingested in large amounts. The leaves of this plant can also irritate skin. The best time to collect dock greens is in early spring, when they are tastiest and least bitter. They are also easier to identify at this stage because of their broad and heart-shaped leaves and wavy margins. The leaf stems are also a distinctive shade of red and can be tinged with purple.

Dock is a perennial, so it comes back year after year. It grows as a basal rosette of leaves and produces tall stalks that bear flowers and seeds. It is often found in neglected and disturbed ground, such as fields and roadsides. It can grow in a wide range of moisture levels, from Pennsylvania (with 44 inches of annual rain) to northern New Mexico. Its deep taproot means that it can be difficult to eradicate. Its seeds are dispersed by wind and water, with their toothed wing structures allowing them to cling to animals and machinery.

This plant contains oxalates, which are poisonous to dogs in high doses. This can lead to nephrotoxicity, which results in kidney failure. This can cause a host of symptoms, including anorexia, incoordination, depression, convulsions, and death. In addition, oxalate poisoning can lead to calcium oxalate crystals in the kidneys and blood vessels.

If your dog ingests this plant, it is essential to seek medical attention immediately. Contact your veterinarian or Poison Control and provide details of the amount ingested and when it occurred. This will help them make an informed decision about the severity of your dog’s condition.

Types of Garage Doors

Avondale Garage Doors come in a variety of styles to complement your home’s architecture and design elements. They can also be insulated to control temperatures in garage and adjacent living spaces, potentially lowering energy costs.

Consider a warranty and maintenance options to maximize the lifespan of your new garage door. Lubrication and inspection help to ensure smooth operation.

Coiling doors, which are also known as overhead rolling doors, use an intricate mechanism that retracts steel slats into a compact coil. They are ideal for areas with limited headroom, such as commercial garages and parking facilities. They also provide heightened security, durability and insulation. They are available in a wide range of colors and customization options, making them a versatile resource for any business or warehouse.

The biggest draw of a roll-up door is that it takes up less space than other styles. The mechanism enables them to retract into the ceiling without requiring extra space for tracks or other components like hinges. This helps free up space for equipment like lighting, HVAC and more, and allows you to better utilize the area. These doors are also more durable and easier to maintain than other types. Unlike sectional doors, which have numerous parts that can collect dust and debris, a roll-up door has fewer moving pieces. This helps prevent the deterioration of cables and springs, which can increase repair costs over time.

A quality commercial roll-up door offers an R-value of up to 8.1, helping your facility stay at a steady temperature and save on heating and cooling costs. This high level of insulation keeps the building airtight and can help you achieve more energy-efficient operations. These doors are also easier to clean than sectional options, as the slats are compact and do not extend outwards.

The upfront cost versus maintenance needs of a roll-up door is another important factor to consider. While a door may have a higher price tag than other options, its long lifespan and low-maintenance requirements could make it the more affordable choice in the long run.

Cornell’s heavy-duty service doors are built to withstand a high number of open and close cycles, providing a long life span for your business. These doors are a great option for high-traffic locations, such as auto repair shops, parking garages and warehouses. They are easy to install and can be customized for any opening size, allowing you to fit them into tight spaces. They are also compatible with high-performance commercial operators for fast cycling, and they can be upgraded with insulation and custom designs to add extra protection and safety.

Slide to the Side Doors

Sliding garage doors offer a sleek, contemporary look and plenty of natural light. They can be outfitted with windows in different shapes, patterns, and sizes to create a custom aesthetic that matches your home design. Plus, they’re also available with screens that allow fresh air circulation while keeping insects and debris out. And like swing doors, sliding doors can be equipped with security bars that mount to the frame when in the closed position for additional burglar resistance.

One drawback to this door type is that it’s more difficult to insulate and seal the area around it, which makes it less energy efficient. However, this can be addressed by installing insulation and using weather stripping, which can help minimize heat loss during the winter and cool air loss during the summer.

Another issue is that sliding doors require extra space to slide open, which limits the amount of storage room you have in your garage. That’s why many homeowners choose to install a stud wall to the right or left of their garage, allowing them to move items in and out without having to worry about obstructing the doorway.

If your sliding garage door is jerking when opening and closing, the tracks may be out of alignment. You can realign them by loosening the screws that hold them in place and gently tapping them with a rubber mallet until they’re straight. Once you’ve done that, you can tighten the screws to secure them in place.

It’s also a good idea to regularly clean your sliding garage door to keep it looking great and performing smoothly. You can use a vacuum cleaner with a brush attachment to remove loose dirt and grime, or you can wash the glass panels using mild, non-abrasive cleaner and a damp cloth. Make sure to wipe down both sides of each panel to keep it looking its best and preventing streaks. For safety, you should also regularly inspect your garage door sensors to ensure they’re still in good working condition. If they’re dusty or misaligned, the sensors can cause your garage door to halt midway through its operation, as they’ll think there’s an obstruction in their path and won’t close.

Side-Hinged Doors

When it comes to a new garage door, most people immediately think of the conventional type that opens upwards, but this isn’t the only option. Many homeowners are now choosing to go for a side-hinged design instead, and this is proving to be an increasingly popular choice.

These doors open horizontally, using hinges located on the door frame. They are ideal if you want to drive through your garage, or if you use the space as a home gym, office or workshop, as they enable you to open just one of the leaves and dart across to get what you need. It also makes access easier for those with mobility problems as they don’t need to lift an up and over or a sectional door.

A wide variety of sizes, styles, materials and finishes are available for these doors, from basic galvanised steel models to insulated, timber or GRP versions with windows. Timber side-hinged garage doors offer a more traditional aesthetic, and can be supplied with a timber sub frame to increase strength and stability. This option is particularly popular for those living close to the sea, as timber provides a natural level of corrosion resistance against salt.

GRP or fibreglass side-hinged doors are very low maintenance and are available with a range of window designs, including energy efficient options rated to a minimum of PAS 241. Timber or GRP doors can also be fitted with uprated locking systems to provide the same security levels as conventional hinged garage doors.

These doors are supplied as a complete set with their own steel fixing sub frame, ready to install into the existing or a new timber frame. They are normally manufactured with equal sized leaves, but left hand leading or a 2/3rds or 1/3rd leaf split can be supplied on request. A single lever handle is located inside and out on these doors, and they can be automated with most boom-style electric operators. A manual release handle is also provided for those who wish to open the door manually when required. These doors are also compatible with a range of door sensors, enabling you to fit your garage with the peace of mind that it can only be opened when someone is present.

Sectional Doors

Sectional doors are a type of garage door that is made up of horizontal panels or sections that are hinged together and slide up and overhead along tracks when opened. They are available in a range of materials, colours and window styles to suit different homes, making them highly customisable. This is one of the reasons why they are a popular choice for both residential and commercial applications. They also come with insulation options to help keep your garage warm in Winter and cool in Summer, resulting in energy savings.

Because they don’t encroach on the drive-through space, these types of garage doors are ideal for arched or angled openings. They are also easier to fit into small spaces than other door types because they don’t require the same amount of headroom for installation. This makes them a great option for both residential and commercial applications that are tight on space.

These garage doors are extremely durable as they are made from robust materials like steel and aluminium. They are also able to resist harsh weather conditions and are a good deterrent against thieves as it’s hard for intruders to get between the interlocking sections of the door.

However, because of the number of moving parts and complicated mechanisms that make up a sectional door, they can be more prone to breakdowns and require a higher maintenance budget than other types of doors. Frequent lubrication and routine checks can prevent potential problems from arising.

These garage doors have a unique and contemporary design that can add an aesthetic to any home, particularly modern ones. They can be manufactured in a wide range of materials, colours and finishes to match any décor or style. This flexibility means that these types of garage doors can be used to create a sophisticated look with a traditional or period-style home, as well as to add a splash of personality to a more contemporary or industrial design.

Handyman Tools

Handyman Lexington, KY, tackles all manner of small repairs and projects. A squeaky rocking chair gets that soothing creak back, and old light fixtures can be updated for safety and style.

A quality set of hand tools is a staple for any handyman. Add a circular saw for straight cuts and power tools like a drill to round out your toolbox.

The circular saw is a versatile tool that can be used for many home improvement projects. It is a great alternative to using a miter saw or table saw for making long, straight cuts. It is also a much more portable option than these larger tools, allowing you to take it with you on jobs where setting up a work station would be impractical or impossible.

When using a circular saw, it is important to follow all appropriate safety precautions. Wearing eye and ear protection is recommended, as well as work gloves to prevent slippage and hand injuries. The area where the saw is to be used should also be clear of any obstructions or debris. It is also a good idea to secure the material for cutting, clamping it firmly or using a vise where possible.

There are a variety of different types of blades available for circular saws, with the selection typically depending on what type of material the user is cutting. For example, there are blades suitable for cutting wood and laminate, as well as blades that can cut metal or plastic. The blade diameter, arbor hole size, number of teeth and kerf (the thickness of the cut the blade creates) will usually be printed on the blade face.

If the saw will be used to make angled cuts, it is advisable to use a guide rail. These are available as standard accessories for most corded and battery-powered circular saws and can be used to ensure accurate and precise straight lines. It is also a good idea to use a spirit level and clamps to prevent any movement during the cut, and always double-check the marked cutting line for accuracy.

When choosing a circular saw, it is a good idea to consider the size and torque of the motor as well as the blade width, bevel angle and type of blade. Other considerations include whether the saw is corded or cordless, and whether it has a right or left-blade version. Finally, it is worth bearing in mind that some more advanced models have the ability to plunge into a workpiece, providing a more precise and clean cut for tasks such as creating openings for vents or electrical outlets.

Miter Saw

A miter saw is a valuable tool for Handyman jobs, particularly framing tasks such as building door frames and walls. This powerful tool allows you to make precise angled cuts, which are essential for clean, professional-looking work. When choosing a miter saw, consider its blade size or diameter and the tooth count, as these factors determine how well the saw cuts different materials. For example, a blade with more teeth is best for hardwoods while a blade with fewer teeth works well for softwoods.

Some miter saws come equipped with a clamp, which helps you secure the piece of wood you’re cutting. This feature is especially important if you’re working with smaller pieces that could get caught in the spinning blade and fly away, causing serious injuries. Many manufacturers also offer an adapter to connect an industrial vacuum cleaner, which can improve dust extraction and reduce the amount of waste you have to dispose of later.

Before using your miter saw, inspect the blade for any chips or dullness. These issues not only decrease precision but can increase the risk of accidents due to slippage or binding. If necessary, replace the blade promptly to maintain accuracy and extend its lifespan.

Similarly, check the fence to ensure it’s straight and free of damage. Depending on the model you have, it may have removable sections that tighten with wing nuts and can be removed without tools. This can be helpful for adjusting the miter and bevel settings when a piece is longer than your saw.

For safety, always use one hand to firmly hold the piece of wood against the fence and the other to operate the saw. Never use both hands to hold the wood, as this can cause kickback, which could send the board flying and injure you. If you’re cutting a piece of wood that’s too long for your saw, rest it on a workbench or stack of scraps next to the saw to support it.

To help you create the desired angled cuts, most miter saws feature adjustable bevel and miter settings. These are often located near the blade, so you can adjust them without turning off the machine and risking injury. Some models include indicators and gauges that let you know when you’ve reached the desired angle. Once you’ve made the adjustment, tighten the knob securely so that it cannot move.

Fish Tape

The fish tape is a hand tool that helps Handyman run wires without having to cut through structural elements. According to Ideal Industries, the device is “used to ‘fish’ electrical wire or other lines into stud bays, wall cavities and conduit runs. It’s also used to snake wires or cables in finished walls and hard-to-reach spaces above ceilings and below flooring.”

These tools are available in a variety of materials, from traditional fiberglass nonconductive models to PET (polyethylene terephthalate) or metal designs that offer heightened durability. They typically house the tape in a donut-shaped case with handle, which allows you to extend the tool, attach the end of the wire or cable, and reel it in as you push the line toward its destination. The types of conditions you’ll encounter in a given job site will influence which type to select, as will the case design. Some include strong, slip-resistant handles; retainers that keep the fish tape in place; and a conduit bending tool to reduce kinking.

A key aspect of using fish tape is planning how far to extend the wire and ensuring you don’t overextend it. To do this, many experts suggest planning ahead by walking off or measuring out the distance you think you’ll need to go, and then marking it with a piece of tape. Some tapes feature laser-etched distance markings for increased accuracy. Others have fast payout and rewind mechanisms to help speed up movement. They’re also designed to be durable and withstand heavy use, with molded overmolds for added comfort and slip-resistant handles for secure gripping.

Always be aware that metal fish tapes can conduct electricity, so you’ll want to make sure power is off in the area before working with them. In addition, you’ll need to check the condition of the area with a wire tester to ensure there are no energized wires or panels in the vicinity. If you do find a live line, turn off the power at your circuit breaker box to prevent injury or shock. If you’re unsure, consider using nonconductive fiberglass fish tape instead.

Electrical Tape

The electrical tape is the insulating and protective staple of any handyman’s tool kit. Used to wrap and bind wires, electrical tape can help prevent dangerous shocks, keep wire connections secure, and prevent splice failure. It also helps meet a variety of other electrical needs, such as color coding and phasing.

When it comes to selecting electrical tape, you want to look for one with a high dielectric strength and a thicker insulation than regular tape. You should also prioritize an electrical tape that carries Underwriters Laboratories (UL) approval, which ensures the tape meets strict safety standards. Regardless of what type of job you’re using electrical tape for, it’s always important to make sure the power is turned off before beginning any work in an area that may contain live wiring.

It is also important to note that electrical tape is not intended as a permanent repair for exposed wiring or connections. Rather, it should be a temporary solution until the wires can be rewound or replaced. If you notice an unexplained uptick in your electricity usage, it could be a sign that your wires are wearing out and need to be replaced.

Another thing to consider when choosing electrical tape is its heat-resistant rating. You’ll want to select a vinyl or rubber electrical tape that is rated for the temperature you are working with. For example, PVC electrical tape can withstand temperatures up to 176 degrees Fahrenheit, while rubber electrical tape can handle up to 221 degrees Fahrenheit.

While many people use electrical tape for a variety of purposes, some are creative and find other uses for this versatile product. For example, it can be used to create a simple stencil for painting or as an alternative to masking tape in arts and crafts projects.

Additionally, it is possible to use electrical tape to add decorative touches to walls or other surfaces. For instance, it can be used to create a tiled Swiss cross on a wall, or even a unique piece of art for your home. While this may seem like a small project, it can add a touch of elegance to any space.

Navigation